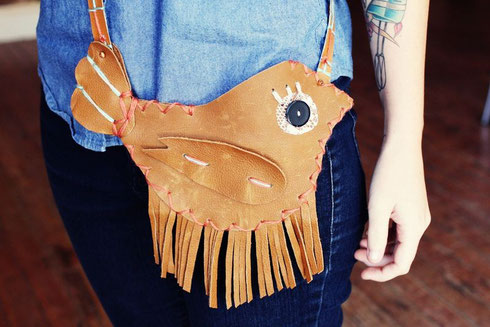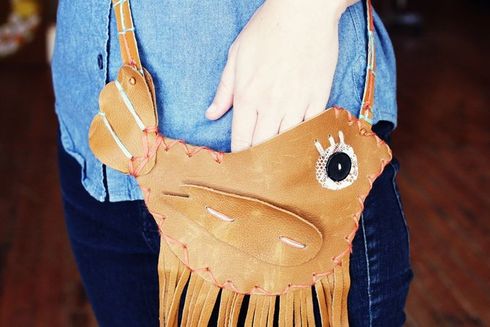
I love statement pieces, especially accessories! I created this pretty bird fringe purse because I wanted something special to wear this Autumn. This pretty project only took me about two hours to create. I hope you enjoy it...
Source: abeautifulmess
This little birdie is my vintage inspiration. I thrifted him a couple years ago and he inspired me to make a larger bag with a similar shape. I added a few personal touches, of course, like 70s style fringe and lace.
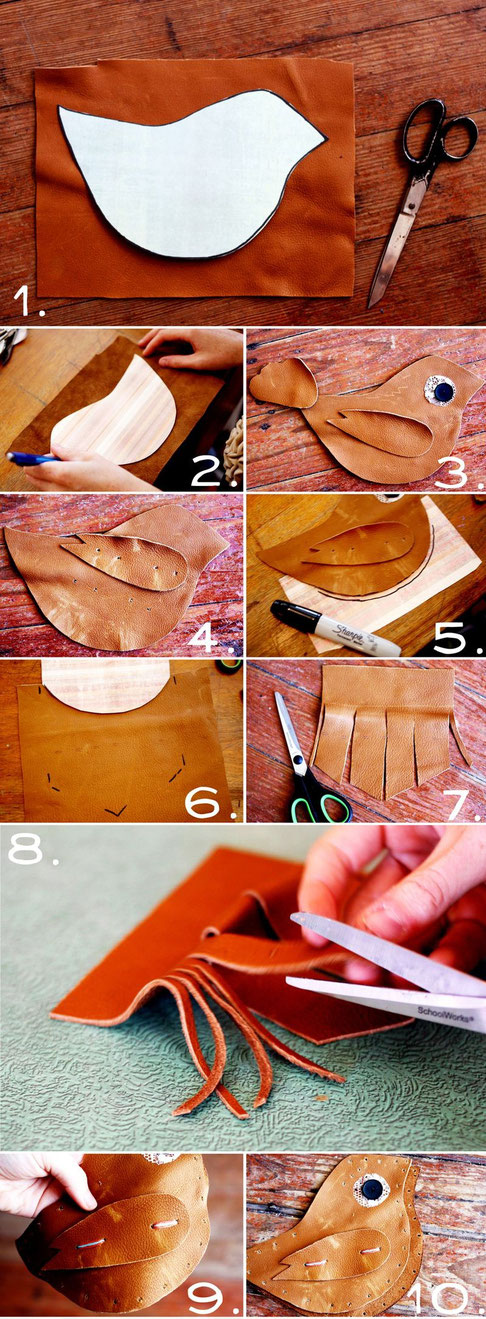
Here's how I made mine.... Supplies Needed: Enough leather (or faux leather) to cut your bird shape (x2), strap and fringe, a small scrap of lace, one black button appx. 1 inch across, scissors, two colors of yarn, paper, a sharpie and a Crop-A-Dile tool. Step 1: Draft a quick pattern on paper for your bird shape. It can be as large of tiny as you like. Mine was about 8 inches wide. Step 2: Trace your pattern onto the back of one piece of leather. Flip the pattern to trace your second side. You should have two bird shapes that match up when the insides are touching. Step 3: Cut all the other pieces you want. I only added details to one side of my bird, so he has one eye, one wing and two sides for his tail (because it's sewn on from both sides). Draft patterns on paper and trace them if you are nervous to cut into your leather. Step 4: Use your Crop-A-Dile tool to punch holes in the leather for the wings. Step 5-8: Use a sharpie to create a template on paper for how wide you want your fringe to be. After you have that part of the pattern you can cut the leather shape for your fringe and start fringing it with scissors. Look closely at the photos to see how I did this. Step 9: Glue lace (eye) on your bird. Allow to dry and then stitch on the button. Next, stitch the wings on. It's always smart to finish all the the detail work on a handbag before sewing it together. Step 10: Punch holes for the exterior of the bag. These should surround the entire bag except for the top. Step 11: Punch any holes needed on your fringe to sew through. It's extremely hard to sew through leather by hand, so try to punch a hole in every spot that you anticipate stitching. Step 12: Put your pattern pieces together, make any last minute tweaks you need to before stitching. Step 13-14: Stitch the two purse pieces together all the way around the bird. Make sure the fringe pieces get caught in your stitches and are secured. Step 15: When you have stiched around the entire bird, go backwards to add another decorativee stitch. (see photo) Step 16-18: Attach tail. I did this step last and I think it created a nice clean look. Step 19-20: Create and attach a simple strap. Measure the strap on your body to be sure you find the perfect length that is comfortable for you. That's all... Have fun stitching this fun and easy birdie purse!
I made a strap with two long strips of leather, lots of punches and yarn. I love the look of the added hand stitches. A simpler solution would be just one long strip of leather (ReStyle a skinny belt?).
A few thoughts about working with leather: I have been working with leather (and faux leather) for many years. I have a stash that I've picked up from a local leather shop. I buy in larger quantities and use them over the years. It's taken me a long time to collect a good assortment of colors and textures, but most shops also sell scraps at a sweet discount! I also use vintage that is heavily damaged for fabric. If you can't afford real leather (it can be a little pricy) you can purchase a vinyl jacket or bag from the 1970s at a thrift shop for a few bucks. That's a budget friendly (and vegan) option!
I hope you've enjoyed my little bird purse D.I.Y. I had so much fun creating it! xo. elsie